Plumbing problems in old homes are common in Santa Barbara and Ventura Counties because aging pipes and older materials can wear down over time. Hidden leaks are a top concern since a slow drip can run behind walls for weeks, then show up as staining or warped baseboards. In homes close to the coastline, salty marine air can speed up corrosion on exposed metal parts.
If you’re in an older home, it’s helpful to learn the early warning signs of a leak so you can address it before water damage worsens. Let’s go over simple ways to confirm a hidden leak and the most common repair paths in older properties.
Why Do Plumbing Problems In Old Homes Stay Hidden?
Older homes were built with pipe materials and layouts that made sense at the time. Many homes built before the 1980s used materials that raise safety and maintenance concerns today, including lead in some plumbing components.
Decades later, it’s common to find mixed pipe types, older shutoff valves, and past repairs that aren’t consistent from one area to the next. That combination can make plumbing problems in old homes harder to spot early, since corrosion, buildup, pressure issues, and drain trouble often start out of sight and show up later as visible damage or recurring performance problems.
What Are the Common Causes Of Hidden Leaks?
In older homes, leaks often come from a few common pipe and connection problems, such as:
- Corrosion inside older pipes that narrows and weakens the line
- Pinhole leaks in aging copper
- Worn supply lines and shutoff valves under sinks and behind toilets
- Joints that loosen over time from minor settling or shifting
- Drain and sewer lines with cracks, buildup, or failing connections
- Older materials like galvanized steel or polybutylene that are more likely to fail
- Clay sewer laterals in pre-1980s homes which are prone to root intrusion and blockages
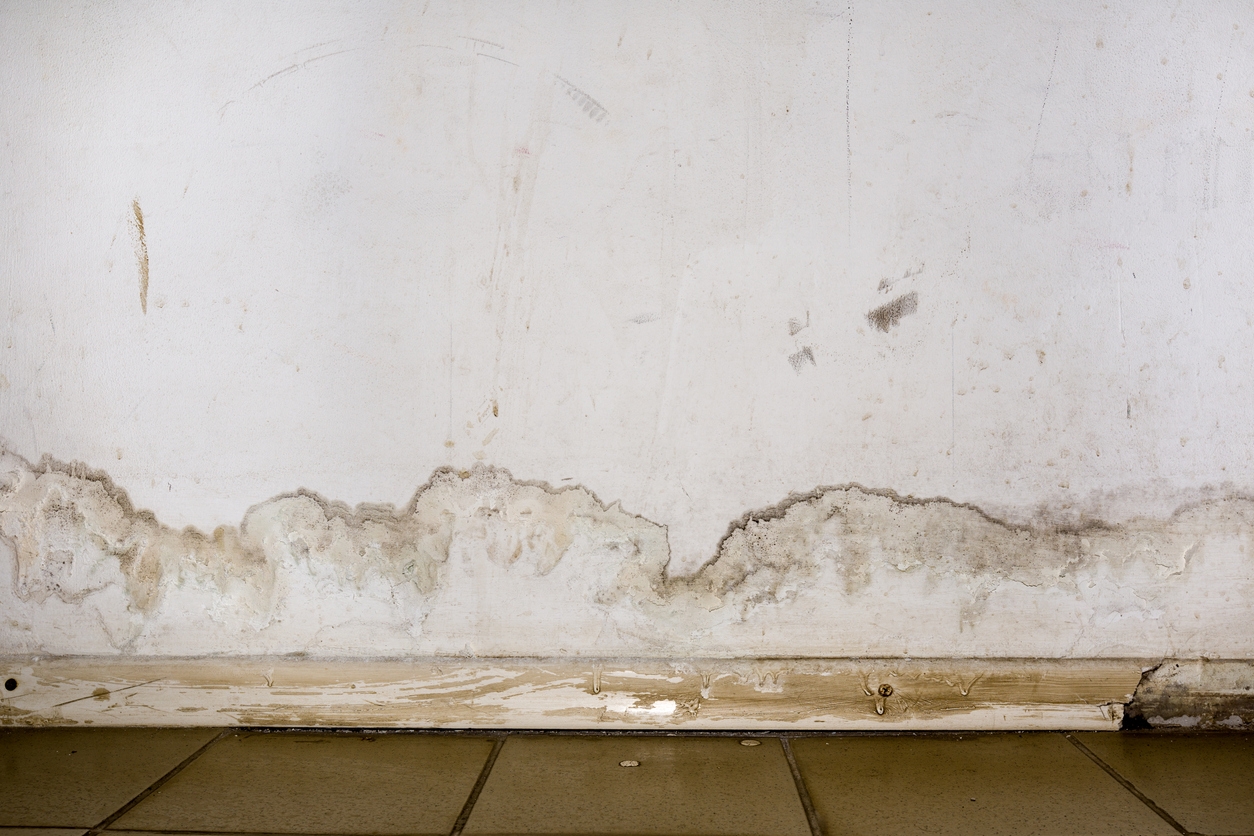
Signs Of A Hidden Plumbing Leak Behind The Wall
Hidden leaks usually show up as changes in the materials around them.
Watch for these warning signs:
- Musty odors near a bathroom, kitchen, or laundry area
- Bubbling paint, peeling wallpaper, or swollen drywall
- Yellow or brown stains on walls or ceilings
- Baseboards that warp, soften, or pull away
- Soft flooring near tubs, showers, toilets, or sinks
- Mold that keeps returning in the same spot
- A sudden jump in the water bill
- The sound of water moving when everything is off
If several signs show up at the same time, treat it like an active leak until it’s ruled out. Schedule a visit with a trusted local plumbing company to find and address the problem before it gets worse.
4 Quick Checks You Can Do To Confirm a Hidden Leak
These steps help you narrow down what’s happening. They also give you clear details to share when you schedule service.
1. Run A Water Meter Test
- Turn off all water inside and outside, including irrigation.
- Write down the meter reading or take a photo.
- Wait 10 to 15 minutes without using water.
- If the meter changes, water is moving somewhere.
2. Compare Hot & Cold Water Clues
If the problem lines up with hot water use, the leak may be on the hot side of the system. If both hot and cold are affected, the leak may be on a shared section of piping.
3. Check Around Fixtures First
Look under sinks and around supply valves for slow drips. Feel the bottom corners of vanities and cabinets for swelling. Watch for white or green mineral buildup on fittings.
4. Feel For A Damp Zone
Put your hand on the wall near the stain or odor. A cool, damp patch can point to moisture behind the surface.
If a ceiling looks swollen or drywall feels soft, don’t press on it. Wet drywall can give way.
Tools To Detect Hidden Plumbing Leaks
Most homeowners spot the damage but struggle to determine the exact source of a leak. That’s where professional help comes in. A licensed plumber will use leak detection tools to reduce guesswork and keep the repair area smaller.
Common leak detection tools include:
- Moisture meters to measure moisture in drywall and flooring
- Thermal imaging to spot temperature differences linked to water movement
- Acoustic listening equipment to help locate leaks inside walls or under slabs
- Pressure testing to confirm a supply line leak and narrow the zone
- Camera inspection to check drains and sewer lines for cracks, offsets, or heavy buildup
Camera inspection is especially helpful when symptoms show up during showers, laundry, or dishwashing, and the issue may be in a drain line, not a pressurized supply line.
How Plumbers Detect Hidden Leaks
The goal is to figure out what kind of leak it is and narrow it down to the exact source with minimal disruption.
Here’s what a typical visit looks like:
- Reviewing symptoms and when they started
- Checking exposed plumbing at fixtures, the water heater, and exterior hose bibs
- Looking for failing shutoffs, including older gate valves that may need an upgrade to modern ball valves for reliable shut-off
- Testing or isolating sections of the plumbing system when needed
- Using detection tools to narrow the leak location
- Confirming the likely source before opening walls or ceilings
How To Detect & Fix Hidden Plumbing Leaks
Once the leak is located, the right repair depends on the pipe’s condition and how much of the system is still in good shape. Some plumbing problems in old homes are solved with one targeted repair. However, recurring leaks in different areas often point to aging piping that needs a broader fix.
Common repair paths for plumbing leaks include:
- Targeted Pipe Repair: Best when the surrounding line is in decent condition. Used for a single failed joint, fitting, or short damaged section.
- Supply Line or Valve Replacement: Common under sinks, behind toilets, and at laundry hookups. A good time to replace hard-to-turn shutoff valves.
- Drain Line Repair: Used when a crack, separation, or failing connection is the cause. Camera inspection helps confirm the exact location.
- Repiping: Replacing old lines with modern materials like copper or PEX can restore normal flow and reduce the likelihood of repeat plumbing issues.
Older Home Plumbing Maintenance Tips For Santa Barbara
A few habits and upgrades can reduce wear on aging pipes and cut down on plumbing problems in aging properties.
Hard Water & Mineral Scale Buildup
Santa Barbara water can be naturally high in minerals, which leads to scale inside pipes and fixtures. A whole-house filtration or softening system can help reduce buildup and extend the life of the plumbing.
Grease & Clog Prevention In Older Pipes
Don’t pour grease down the drain! Dispose of it in the trash instead. Older, narrower pipes in historic homes can collect hair, grease, and soap scum faster, leading to frequent clogs. If drains are already slow, professional drain cleaning or hydro jetting can clear buildup and help restore normal flow without stressing older lines.
Low Water Pressure From Demand or Leaks
Pressure drops can happen when multiple fixtures run at once, mineral buildup restricts flow, or an underground leak develops. Clean faucet aerators and showerheads, then note when the pressure dips so a plumber can test the system and pinpoint the cause faster.
Renovations That Call For Plumbing Upgrades
Remodels can strain older plumbing if the pipes and shutoffs are already worn. Before work starts, have the plumbing checked and confirm the existing pipe sizes and shutoff condition so the new layout performs well and you can avoid call-backs.
Cold Weather Protection & Attic Equipment Basics
Insulate exposed pipes to reduce the risk of freezing and cracking during cold spells. If you have plumbing or equipment in the attic, keep the area accessible and properly insulated so that moisture can drain correctly and your system is protected.
When Repiping Aging Pipes Makes Sense
One leak doesn’t automatically mean repiping. Patterns matter.
When Repiping Enters The Conversation
If your plumbing inspection shows widespread corrosion or repeated failures, it may be time for a home repipe. It’s a practical choice when repairs keep coming up in different areas and the piping is wearing out.
Repiping usually takes one to a few days, depending on access and the size of your home. Your plumber will plan the new pipe route, install the lines, and then pressure test the system to confirm proper flow and shutoff.
During a repipe, you’ll have to plan for scheduled water shutoffs and small access openings where piping runs.
Repiping is worth discussing if you have:
- Multiple leaks in the last 12 to 24 months
- Low pressure across several fixtures
- Discolored water that keeps coming back
- Frequent drain problems tied to older piping
- Visible corrosion on exposed pipe sections
Next Steps With Rooter Solutions
Hidden leaks are stressful, especially in older homes where finishes can be harder to match. Rooter Solutions can locate the source using leak detection and camera inspection, then walk you through repair options, including repiping when it fits the condition of the system. In some areas, aging city infrastructure can also contribute to issues like pressure changes, so having clear testing and documentation helps you make the right call.
If you are noticing musty odors, bubbling paint, or unexplained staining in your older Santa Barbara home, schedule an inspection to stop the damage early.
Stop Hidden Leak Damage Before Repairs Get Bigger With Rooter Solutions in Santa Barbara & Ventura County
If you’re seeing signs of a hidden plumbing leak behind a wall, don’t wait for water damage to spread. Rooter Solutions can pinpoint the source with camera inspection and proven tools to detect hidden plumbing leaks, then handle the repair plan with clear next steps. Call or send us a message today to schedule your inspection!
 805-203-8111
  Leave a Review